Drawing hairstyles can transform your artwork from ordinary to extraordinary. Whether you’re sketching portraits or creating character designs we’ve all faced that moment when we need to capture the perfect hairstyle but don’t know where to start. The secret lies in understanding how different hair textures flow and mastering the fundamental techniques that bring your drawings to life.
We know how frustrating it can be when your hairstyle drawings look flat or unrealistic. That’s why we’ve compiled the most effective drawing techniques and creative hairstyle ideas that’ll help you create stunning hair illustrations. From loose waves to intricate braids these methods will give you the confidence to tackle any hairstyle with precision.
Ready to elevate your drawing skills? We’ll show you step-by-step approaches that professional artists use to create ever-changing flowing hair that captures movement and personality in every stroke.
Getting Started With Basic Hairstyle Drawing Techniques
We’ll build upon our foundation by exploring fundamental techniques that transform flat sketches into ever-changing hairstyle illustrations.
Understanding Hair Structure and Flow
Direction patterns determine how realistic your hairstyle drawings appear. We observe that hair naturally grows in exact directions from the scalp, creating predictable flow patterns. Start by identifying the crown area where hair radiates outward in circular motions. Follow the natural fall of hair sections as they cascade down the head’s contours.
Volume distribution affects the overall silhouette of your hairstyle drawings. We notice that hair creates mass at different points depending on length, texture, and styling. Short hair typically adds volume around the ears and nape. Medium lengths build fullness at shoulder level. Long hairstyles create weight that pulls hair downward while maintaining body at the roots.
Parting lines establish the foundation for all hairstyle variations. We use center parts for symmetrical styles, side parts for asymmetrical looks, and zigzag parts for textured appearances. Each parting type influences how hair sections flow and where volume concentrates in your drawing.
Essential Drawing Tools and Materials
Pencil grades create different textures and values in hairstyle drawings. We recommend using H pencils (2H, H) for initial guidelines and light sketching. HB pencils work perfectly for medium tones and general hair outlines. B pencils (2B, 4B, 6B) produce rich darks and deep shadows that give hair dimension.
Blending tools smooth harsh lines and create realistic hair textures. We employ blending stumps for small detail areas like individual hair strands. Tortillons help blend medium sized sections of hair mass. Paper towels work excellently for large area blending and creating soft highlights.
Paper selection impacts the final quality of your hairstyle illustrations. We choose smooth paper (Bristol board, marker paper) for detailed, precise hair work. Medium texture paper (drawing paper, sketch paper) provides tooth for blending. Rough paper creates interesting textures but requires more skill to control.
Basic Shapes and Guidelines for Hair
Geometric foundations simplify complex hairstyle construction. We start with basic shapes that match the intended hairstyle. Use ovals for bob cuts and rounded styles. Apply rectangles for blunt cuts and geometric hairstyles. Employ triangular shapes for layered cuts and voluminous styles.
Construction lines guide accurate hair placement and proportions. We draw the hairline first, typically positioned one to one and a half eye widths above the eyebrows. Mark the crown point at the head’s highest area. Establish the nape line where hair meets the neck. Connect these reference points to create the hair’s outer boundary.
Sectioning methods organize complex hairstyles into manageable drawing segments. We divide hair into major sections: top, sides, and back areas. Break down each section into smaller subsections based on the hairstyle’s natural partings. Draw each section separately, then blend the connections for seamless transitions.
Drawing Short Hairstyle Ideas
 1")
Short hairstyles offer unique opportunities for artists to showcase precision and attention to detail in their illustrations. We’ll explore three popular categories that provide excellent practice for developing your hair drawing skills.
Pixie Cut Variations
Undercut pixie cuts challenge us to master contrast between different hair lengths within a single style. Draw the sides and back with minimal strokes to show closely cropped hair, then add fuller volume to the top section using layered pencil work. Sketch the longer top portion with flowing directional lines that suggest natural hair movement and styling possibilities.
Layered pixie cuts require careful attention to texture building through strategic line placement. Create depth by drawing shorter base layers first, then adding longer pieces that overlap naturally. Focus on varying your stroke weights to distinguish between different layer lengths, making some strands appear to sit beneath others for realistic dimension.
Pixie cuts with bangs demand precision in framing the face through careful angle consideration. Start by establishing the hairline, then draw bangs that follow the natural curve of the forehead. Whether you’re illustrating straight cut bangs, side swept variations, or angled styles, maintain consistent hair direction to achieve believable results.
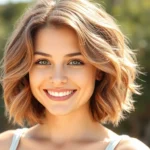
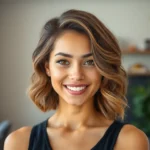
Bob Hairstyles and Their Angles
Classic bobs serve as foundational exercises for understanding geometric hair shapes in illustration. Draw a clean horizontal line around the jawline as your guide, then build the hair volume above this boundary. Maintain equal length distribution around the entire head, paying special attention to how the hair falls naturally around the ears and neck.
Angled bobs introduce ever-changing asymmetry that adds visual interest to portrait drawings. Sketch the back section shorter than the front, creating a diagonal cutting line that slopes downward from back to front. This technique helps us understand how varying lengths create movement and modern styling effects in our illustrations.
Inverted bobs flip traditional proportions by making the back longer than the front sections. Begin drawing from the nape of the neck with longer strands, then gradually reduce length as you move toward the face. This reversed approach teaches us to think differently about hair volume distribution and creates striking silhouettes in character designs.
Textured Short Styles
Messy textured styles give us freedom to experiment with irregular line work and organic shapes. Use short, choppy strokes in varying directions to create an undone, casual appearance. Layer different stroke weights and angles to build realistic texture that suggests natural hair movement and styling product effects.
Structured textured cuts like buzz cuts and fades require precise technique to show clean, defined edges. Draw these styles with controlled, consistent strokes that follow the head’s contours. Focus on gradual transitions between different hair lengths, using subtle shading to indicate where longer sections meet shorter cropped areas.
Layered textured styles combine elements from both messy and structured approaches to create versatile illustrations. Start with a solid foundational shape, then add varied strand lengths using directional strokes. Build texture through overlapping lines that suggest different hair lengths working together to create overall volume and movement.
Creating Medium-Length Hairstyle Drawings
 2")
Medium-length hair offers exciting opportunities for practicing complex texture work and movement patterns. We’ll explore three essential styles that help develop your drawing skills while mastering different hair flow techniques.
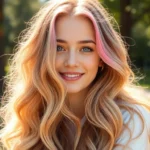
Shoulder-Length Waves and Curls
Shoulder-length waves and curls represent one of the most popular medium-length hairstyles that add natural movement and visual texture to your drawings. These styles require understanding how hair curves and flows around the shoulders, creating ever-changing shapes that bring life to your artwork.
Drawing these styles effectively involves using long, curved pencil strokes to capture the organic shapes of individual curls. We recommend starting with the overall silhouette before adding detailed curl patterns, working from the scalp outward to maintain proper proportions.
Wave patterns require smooth, flowing lines that demonstrate the gentle undulation of hair as it moves around the head and shoulders. Focus on varying your curve intensity to create realistic wave depth, ensuring each wave connects naturally to the next section.
Layered Styles and Movement
Layered hairstyles enhance movement and create dimensional depth that makes medium-length hair appear more voluminous and ever-changing. These cuts involve multiple hair lengths that stack and blend together, requiring careful attention to how different layers interact visually.
Creating convincing layered styles demands focus on volume distribution and depth perception in your drawings. We use varying line lengths to indicate different layer positions, with shorter strokes representing upper layers and longer lines showing the underlying hair length.
Movement becomes crucial when depicting layers, as hair strands should appear to float naturally around the head rather than lying flat. Drawing techniques involve creating hair segments that seem to lift away from the scalp, using directional strokes that follow the natural fall of each layer.
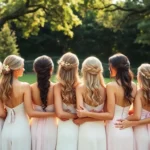
Half-Up Hairstyle Combinations
Half-up hairstyles combine elegant sophistication with casual accessibility by pulling the top portion of hair upward while leaving the lower section loose and flowing. These versatile styles offer excellent practice for understanding hair tension and movement transitions.
Starting your half-up drawings requires marking the separation point where hair transitions from secured to loose sections. We begin by establishing this division line, then work on the upward sweep of the gathered hair using confident, swooping strokes that show the pulling motion.
Details like loose face framing strands add authenticity to half-up styles, softening the overall look while demonstrating advanced hair drawing techniques. These decorative elements require delicate line work that contrasts with the bolder strokes used for the main hair masses, creating visual interest and realistic styling effects.
Mastering Long Hairstyle Illustration Techniques
 3")
Long hairstyles present unique drawing challenges that require understanding how hair moves and behaves under gravity’s influence. We’ll explore advanced techniques for capturing the natural flow and texture that makes long hair illustrations come alive.
Straight Hair Flow and Direction
Establishing the hairline and parting forms the foundation of realistic straight hair illustrations. We begin by defining these key elements to guide the direction and natural fall of the hair strands.
Drawing straight hair requires simple line work that follows the hair’s natural path from root to tip. Consider whether your subject has bangs when planning the initial sketch, as this affects the overall flow pattern and direction of the surrounding hair.
Adding subtle inner curls at the ends creates ever-changing movement in otherwise static straight hair. This technique prevents the illustration from appearing flat while maintaining the straight hair characteristic that defines the hairstyle.
Braided Hairstyle Patterns
Basic braid construction starts with understanding the three strand interweaving pattern that forms the foundation of most braided styles. We sketch the overall braid shape first, then add the crossing pattern details that create the characteristic woven appearance.
Texture details bring braided hairstyles to life by showing how individual sections interact with surrounding hair. Focus on the way braided sections catch light differently than loose hair, creating natural shadows and highlights along the woven pattern.
Experimenting with braid variations like French braids, fishtail braids, or boxer braids expands your artistic repertoire. Each style requires different approach techniques, from tight geometric patterns to loose flowing weaves that complement various character designs.
Voluminous Curly Hair Textures
Curved line techniques capture the natural coil patterns found in curly hair by following each strand’s individual spiral shape. We use varying curve intensities to show different curl types, from loose waves to tight corkscrews that define the hair’s unique texture.
Shading creates depth and volume in curly hair illustrations by emphasizing the three dimensional quality of each curl. Strategic shadow placement between curl clusters and highlight positioning on curl peaks gives the hair realistic bounce and movement.
Incorporating loose strands and flyaways adds authentic movement to curly hair drawings. These details show how curly hair naturally breaks free from styled patterns, creating the organic texture that makes the illustration feel alive and ever-changing.
Drawing Trending Modern Hairstyle Ideas
 4")
Modern hairstyle trends in 2025 offer exciting opportunities to expand your drawing skills with bold cuts and innovative styling techniques. We’ll explore three cutting-edge styles that challenge traditional approaches while providing valuable practice for contemporary hair illustration.
Undercut and Fade Variations
Undercut styles feature dramatically shaved sides or back sections while maintaining longer hair on top, creating striking visual contrast that’s perfect for practicing different hair lengths in a single drawing. We recommend starting with the sharp transition line where short meets long hair, using firm strokes to define this crucial boundary. The fade technique requires gradual blending from longer hair to progressively shorter sections, following your subject’s natural head curvature.
Skin fades create the most dramatic effect by tapering hair down to bare skin, while low fades begin the transition closer to the ears and high fades start higher up on the head. We suggest practicing each variation separately to master the subtle differences in line work and shading. Pay special attention to the hairline direction and use cross-hatching techniques to show the gradual length changes that make fade cuts so visually compelling.
Color Block and Ombre Effects
Color block hairstyles showcase bold, solid patches of contrasting colors that require precise line work and clear color boundaries in your drawings. We approach these styles by first sketching the hair’s basic shape, then mapping out distinct color sections with sharp, well-defined edges. Each color block should maintain its own highlight and shadow patterns to create realistic depth and dimension.
Ombre effects demand smooth gradient transitions from dark roots to lighter ends or between multiple colors, challenging you to master subtle blending techniques. We recommend using varied pencil pressure or digital blending tools to achieve seamless color flow that mimics natural hair movement. Focus on how light reflects differently across each color section, emphasizing contrast points where colors meet to maximize visual impact and create professional-looking results.
Asymmetrical and Edgy Styles
Asymmetrical cuts feature intentionally uneven lengths with one side notably longer than the other, creating ever-changing visual tension that adds personality and movement to portraits. We start these drawings by establishing clear guidelines to map the imbalance while ensuring the overall composition remains visually pleasing. The longer side typically requires more detailed strand work to show how hair naturally falls and moves away from the face.
Choppy layers and bold angular cuts define edgy hairstyles that break conventional styling rules through irregular textures and unexpected shapes. We emphasize the importance of varying your stroke direction to capture the spontaneous, textured appearance that makes these cuts so striking. Sharp angles and deliberate imperfections require controlled yet confident line work, balancing structured elements with organic hair movement to achieve authentic, contemporary results.
Illustrating Classic and Vintage Hairstyle Ideas
 5")
Classic vintage hairstyles offer extraordinary opportunities for developing advanced drawing techniques through their structured forms and intricate details. These timeless styles challenge us to master volume representation and precise geometric shapes that defined entire eras.
1950s Victory Rolls and Pin Curls
Victory rolls present one of the most recognizable hairstyles from the 1940s and 1950s, featuring distinctive open front rolls positioned strategically above the ears and eyes. We capture these dramatic styles by focusing on their characteristic volume and rounded shapes that create bold silhouettes. The technique involves drawing two or three prominent rolls secured with bobby pins, emphasizing the way hair curves upward and inward to form these sculptural elements.
Pin curls offer a contrasting approach to the same era, lying flat against the head rather than creating dramatic height. These vintage techniques require careful attention to wave patterns that flow naturally across the scalp. We illustrate pin curls by showing how sections of hair curve and spiral into tight formations, often creating rhythmic patterns that follow the head’s natural contours.
Both styles demand precision in capturing the structured nature of 1950s hair fashion, where every curl and roll served a exact aesthetic purpose in the overall design.
1960s Beehive and Bouffant Styles
Beehive hairstyles epitomize 1960s glamour through their towering height and rounded silhouettes that dominated the decade’s fashion scene. We achieve these dramatic looks by emphasizing the teased texture at the crown and the way hair builds upward to create substantial volume. The key lies in illustrating how hair is lifted and secured with strategic placement of hairpins and generous applications of hairspray.
Bouffant styles offer a more versatile interpretation of the same volumizing principles, allowing for both dramatic and subtle variations. These hairstyles require careful shading to show how teased hair creates depth while maintaining a polished surface appearance. We focus on the contrast between the textured interior volume and the smooth outer layer that conceals the structural foundation.
Drawing these styles successfully means understanding how height and width proportions worked together to create the iconic 1960s aesthetic that revolutionized hair fashion.
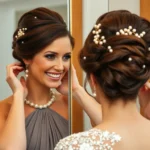
Timeless Updos and Chignons
Updos cover a broad category of hairstyles where hair is styled upward and away from the face, ranging from simple buns to elaborate formal arrangements. We approach these versatile styles by first establishing the underlying structure before adding decorative elements or texture details. The foundation shapes determine how hair flows and twists into their final positions.
Chignons represent the epitome of elegant updos, featuring hair that’s twisted and secured at the back of the head in sophisticated arrangements. These formal styles require careful attention to how sections of hair interact and overlap to create seamless, polished appearances. We emphasize the smooth lines and refined shapes that make chignons perfect for special occasions and professional settings.
When illustrating these classic styles, we focus on capturing volume distribution, secure attachment points, and the refined details that separate amateur attempts from professional results.
Adding Texture and Detail to Hair Drawings
 6")
Achieving realistic hair drawings requires mastering exact techniques that bring dimension and life to your illustrations. Let’s explore the essential methods for creating authentic hair texture and detail.
Creating Realistic Hair Strands
Breaking down hair into abstract shapes helps us understand its complex structure before adding individual strands. We start by analyzing the overall form and identifying how different sections flow together, which provides a foundation for realistic strand placement.
Dividing hair into distinct clumps creates the layering effect that gives our drawings depth and dimension. Each clump represents a section of hair that moves together, and we need to recognize how these sections overlap to create natural volume.
Adding individual strands within each clump transforms flat shapes into realistic 3D forms. We focus on varying the thickness and direction of these strands, ensuring they follow the natural flow patterns established by our initial shapes.
Paying attention to strand direction becomes crucial since hair can flow in multiple directions even within the same hairstyle. We observe how gravity, movement, and styling affect each section, then translate these observations into confident pencil strokes.
Shading Techniques for Depth
Starting with our darkest areas establishes the foundation for realistic hair shading. We use softer pencils like B or 2B to shade areas around the neck and parting lines first, as these regions naturally receive less light.
Applying shading in layers helps us build up the contrast between darker underlayers and lighter top layers. This technique mimics how light interacts with hair’s natural structure, where underneath sections appear darker due to reduced light exposure.
Maintaining consistent contrast throughout our shading process ensures the hair appears three dimensional. We gradually build up tones rather than applying heavy pressure all at once, which allows for better control over the final result.
Recognizing that underneath layers are generally darker while top layers catch more light guides our shading decisions. This understanding helps us create convincing volume and prevents our hair drawings from appearing flat or lifeless.
Highlighting and Light Reflection
Creating highlights through contrast rather than drawing individual hairs produces more convincing results. We focus on establishing clear distinctions between light and dark areas, which naturally suggests the presence of individual strands without overworking the drawing.
Using erasers strategically allows us to create subtle highlights that enhance the hair’s dimensionality. We lift graphite from areas where light would naturally hit the hair, creating realistic shine and movement.
Considering the light source direction becomes essential for placing highlights and shadows accurately. We determine where our imaginary light originates, then apply this knowledge consistently throughout the entire hairstyle to maintain believable lighting.
Focusing on broad highlight areas rather than tiny details prevents our drawings from becoming overworked. This approach creates more convincing hair texture while maintaining the overall harmony of our illustration.
Drawing Hair Accessories and Embellishments
 7")
Now that we’ve mastered texture and detail techniques, we’ll explore how accessories can elevate our hairstyle drawings and add personality to our illustrations.
Headbands and Hair Clips
Headbands require careful attention to how they rest against the forehead and integrate with the hair’s natural flow. We position them by considering the head’s curvature and ensure they follow the hairline’s natural shape. Simple lines and curves work best for sketching these accessories while maintaining the hair’s movement and direction.
Hair clips present unique challenges as they need to appear naturally placed within the hairstyle. We focus on their exact placement points and how they interact with surrounding hair strands. The clips should look like they’re actually holding hair rather than sitting on top of it. Different clip styles require varying approaches, from bobby pins that disappear into the hair to decorative barrettes that serve as focal points.
Integration becomes crucial when multiple accessories appear in one hairstyle. We ensure each element complements the others without creating visual competition. The hair’s texture and volume should influence how we draw these accessories, making them appear naturally embedded rather than artificially placed.
Flowers and Decorative Elements
Flowers in hair drawings demand an organic, natural appearance that suggests they belong with the hairstyle. We use soft, curved lines to capture their delicate petals and consider how they’re secured to prevent them from looking like they’re floating. Fresh flowers appear different from artificial ones, requiring attention to their natural droop and petal variations.
Decorative elements like beads, sequins, or jeweled pins add sparkle and visual interest to our drawings. We focus on their texture and reflective properties, using strategic highlights to suggest their shine. These elements often catch light differently than hair, creating contrast points that can enhance the overall composition.
Placement strategy affects how natural these decorations appear in our drawings. We consider the hair’s structure and choose logical attachment points where decorations would naturally rest or be secured. The size relationship between decorative elements and hair sections helps maintain realistic proportions throughout our illustration.
Scarves and Ribbon Integration
Scarves and ribbons introduce flowing fabric elements that complement hair movement in ever-changing ways. We use flowing lines to capture how these materials wrap around the head or weave through hairstyles. The fabric’s weight and texture influence how it falls and interacts with the hair’s natural patterns.
Ribbon integration requires understanding how these materials behave when tied or woven through hair sections. We pay attention to how ribbons create bows, knots, or streaming tails that add movement to our compositions. The ribbon’s width affects how much hair it displaces and how it sits within the overall hairstyle structure.
Color and pattern considerations become important when drawing scarves and ribbons, even in graphite drawings. We suggest these elements through varied line weights and shading techniques that differentiate them from the surrounding hair. The contrast between smooth fabric and textured hair creates visual interest that enhances our overall illustration quality.
Digital vs Traditional Hairstyle Drawing Methods
 8")
Now that we’ve covered various hairstyle drawing techniques and details, let’s explore the different mediums and tools available for creating compelling hair illustrations.
Pencil and Paper Techniques
Traditional drawing methods using pencil and paper offer us the most tactile experience when creating hairstyle illustrations. Graphite pencils allow us to achieve intricate details and natural textures that bring hair drawings to life. We find that the physical resistance of paper against our pencil creates organic variations in line weight that can’t be replicated digitally.
Colored pencils expand our creative possibilities by adding depth and dimension to our hair illustrations. We can layer different tones to create realistic highlights and shadows that make our drawings more compelling. The blending capabilities of traditional media help us achieve smooth transitions between different hair sections.
Traditional drawing limitations include:
- Flexibility: Making major changes requires starting over
- Color options: Limited to available pencil colors
- Editing capabilities: Corrections can be challenging without compromising paper quality
Digital Art Tools and Software
Digital platforms like Adobe Photoshop and Procreate revolutionize how we approach hairstyle drawing by offering unlimited creative possibilities. These programs provide us with extensive customization options that traditional methods simply can’t match. We can experiment with different brush settings to simulate various hair textures and effects.
Drawing tablets and styluses give us precision control over our digital illustrations while maintaining the natural drawing experience. We’re able to manipulate lines, colors, and textures with incredible accuracy using these tools. The ability to work in layers allows us to separate different hair sections and make adjustments without affecting other parts of our drawing.
Digital advantages include:
- Easy editing: Undo functions and layer management
- Color flexibility: Unlimited color palettes and blending modes
- Efficiency: Quick copying, scaling, and transformation tools
Combining Both Approaches
Hybrid drawing methods leverage the strengths of both traditional and digital techniques to create superior hairstyle illustrations. We often begin with traditional pencil sketches to capture the natural flow and organic feel of hair movement. This initial sketch provides us with a solid foundation that feels authentic and spontaneous.
Digitizing our traditional sketches opens up endless refinement possibilities while preserving the original character of our work. We can enhance colors, adjust proportions, and add special effects without losing the tactile quality of our initial drawing. This approach gives us the best of both worlds by combining natural texture creation with digital flexibility.
- Sketch: Create initial drawing with traditional pencils
- Scan: Digitize artwork at high resolution
- Refine: Use digital tools for color and detail enhancement
- Finalize: Combine traditional textures with digital precision
Common Mistakes to Avoid When Drawing Hairstyles
 9")
Even experienced artists can fall into common traps when illustrating hair. We’ll examine the most frequent errors that can undermine your hairstyle drawings and how to avoid them.
Proportional Errors and Head Shape
Inadequate skull space ranks as the most critical mistake beginners make when drawing hairstyles. We often see characters with unrealistically small craniums because artists don’t allocate enough room for the skull beneath the hair. This oversight creates an imbalanced look that immediately signals amateur work.
Incorrect head shape assumptions lead to unnatural hairstyle placements. The human skull isn’t perfectly round but rather elongated from a side view. We must account for this elongated shape when positioning hair, as failing to do so results in hairstyles that appear disconnected from the head structure.
Oversized hair volume commonly occurs when we forget to consider the skull’s actual dimensions. Hair should complement the head’s natural proportions, not overwhelm them. Professional artists always establish the skull’s boundaries before adding hair layers.
Unrealistic Hair Movement
Ignoring natural hair flow creates the most obvious sign of amateur hair drawings. Hair naturally follows the scalp’s contours and responds to gravity’s pull. We see this mistake when artists draw hair that seems to float or move against natural physics.
Inappropriate hair parting placement confuses the entire hairstyle’s direction. We must determine where hair parts before beginning our illustration, as this decision affects every strand’s flow pattern. Without establishing clear parting lines, our drawings appear disorganized and lack cohesion.
Gravitational inconsistencies plague many hairstyle drawings. We need to consider how different hair types respond to gravity and movement. Straight hair behaves differently from curly hair, and each requires exact attention to realistic flow patterns.
Inconsistent Texture Patterns
Uniform strand sizing creates an unnatural, plastic appearance in hair drawings. We observe this mistake when every hair strand appears identical in thickness and length. Natural hair contains varying strand sizes that create visual interest and authenticity.
Inconsistent flow direction within single hairstyle sections destroys the drawing’s unity. We must maintain consistent hair flow that follows the head’s shape and established parting patterns. Mixed directions within the same hair section create confusion and unrealistic results.
Scratchy line work makes hair appear rough and unfinished. We achieve better results using smooth, confident strokes that follow the hair’s natural direction. Hesitant, scratchy lines immediately signal inexperience and detract from the overall drawing quality.
Overwhelming strand detail occurs when we attempt to draw every individual hair. This approach creates visual chaos and loses the hairstyle’s overall shape. We should focus on capturing hair’s general flow and texture rather than individual strand details.
Conclusion
Drawing hairstyles doesn’t have to feel overwhelming when you’ve got the right techniques and understanding under your belt. We’ve walked through everything from basic shapes and construction methods to advanced texturing and digital tools that’ll transform your hair illustrations.
Remember that mastering hairstyle drawing is all about practice and observation. Whether you’re sketching short pixie cuts or flowing long waves we’ve shown you how to break down complex styles into manageable steps. The key is understanding hair’s natural movement and structure rather than getting caught up in every single strand.
Don’t be afraid to experiment with both traditional and digital methods to find what works best for your artistic style. With these techniques and a willingness to learn from common mistakes you’ll be creating ever-changing realistic hairstyles that bring your characters to life.
Frequently Asked Questions
What are the essential tools needed for drawing realistic hairstyles?
The basic tools include various pencil grades (2H to 6B), blending stumps or tortillons, kneaded erasers, and quality drawing paper. Harder pencils (2H-H) work well for initial sketches and light areas, while softer pencils (2B-6B) create darker tones and shadows. Blending tools help achieve smooth transitions, and proper paper texture significantly impacts the final result.
How do I start drawing complex hairstyles without getting overwhelmed?
Begin by breaking down complex hairstyles into basic geometric shapes and construction lines. Use simple guidelines to establish the overall direction and flow of the hair. Divide the hairstyle into manageable sections, working from general shapes to specific details. This systematic approach prevents overwhelm and ensures better proportions.
What’s the difference between drawing short, medium, and long hairstyles?
Short hairstyles like pixie cuts and bobs require precision in volume distribution and clean lines. Medium-length styles focus on capturing natural flow and layering effects. Long hairstyles present unique challenges in showing movement and weight, requiring advanced shading techniques and careful attention to how hair falls and moves naturally.
How can I make my hair drawings look more realistic and less flat?
Focus on understanding hair structure, direction patterns, and volume distribution. Use varied line weights and proper shading techniques to create depth. Pay attention to how hair naturally flows around the head’s shape, and avoid making all strands the same thickness. Strategic highlights and shadows add dimension and realism.
Should I use traditional or digital methods for drawing hairstyles?
Both methods have advantages. Traditional drawing offers tactile experience and organic textures, while digital tools provide easy editing and color flexibility. Many professional artists use a hybrid approach, starting with traditional sketches and refining digitally. Choose based on your comfort level and desired final result.
What are the most common mistakes when drawing hair?
Common errors include incorrect head proportions, unrealistic hair movement, and inconsistent textures. Artists often make uniform strand sizes, use scratchy line work, or ignore natural parting lines. Avoiding these mistakes requires understanding skull anatomy, maintaining consistent flow direction, and focusing on overall hair behavior rather than excessive individual strand detail.
How do I draw different hair textures effectively?
Different textures require specific techniques. Straight hair needs clean, flowing lines with subtle variations. Wavy hair uses gentle curves and layered sections. Curly hair demands understanding of spiral patterns and volume distribution. Practice observing real hair textures and adapt your line work and shading accordingly.
Can hair accessories enhance my hairstyle drawings?
Yes, accessories like headbands, clips, and ribbons add visual interest and complexity to drawings. They should interact naturally with the hair, following its flow and movement. Proper placement and realistic rendering of accessories can elevate simple hairstyles and provide opportunities to practice different textures and materials.