To get the haircut you want, bring 2–3 reference photos showing different angles of your desired style. Learn fade versus taper terminology and guard numbers so you can discuss lengths precisely. Break down what you want: top length, side gradient, and back shape.
Ask your barber questions about your hair type and face shape. Confirm the entire plan before cutting starts. Schedule regular appointments to refine your look over time, and you’ll discover exactly how to maintain it.
Get the Haircut You Want: The Communication Blueprint
Ever walk out of the barbershop feeling like your haircut missed the mark?
Ever walk out of the barbershop feeling like your haircut missed the mark? Clear communication is the solution.
The problem usually isn’t your barber’s skill; it’s miscommunication. I’ve learned that nailing your desired look requires preparation and clear dialogue. Start by writing a brief outline noting top, side, and back lengths. Specify whether you want a fade or taper, and choose a squared or tapered neckline.
Bring 2–3 reference photos showing different angles. Explain what appeals to you about each image. Learn clipper terminology like guard numbers (#2, #3) so you’re speaking your barber’s language.
Finally, discuss your lifestyle honestly. Share when you got your last haircut, how often you’re willing to maintain it, and your daily styling routine. This communication transforms a guessing game into a partnership.
Know Your Hair Type and Face Shape First

Before you book that appointment, understand your hair’s natural texture and thickness. What works for someone with fine, straight hair won’t necessarily work for you if you have thick curls. Your face shape matters just as much; you can’t ask your barber for the right cut without knowing whether you have a round, square, or oval face that needs specific framing. Take a few minutes to identify these basics, and you’ll walk into that barber chair with the confidence and clarity that actually gets you the haircut you want.
Hair Texture and Thickness
What your hair does when you wake up in the morning tells you everything about your texture and density. Your hair type determines how a cut will sit and what maintenance you’ll need.
| Hair Type | Texture | Density | Styling Needs |
|---|---|---|---|
| Straight | Sharp lines | Varies | Minimal product |
| Wavy | Soft definition | Medium | Regular shaping |
| Curly | Hidden lines | Often thick | Texturizing cuts |
Thicker hair holds volume better but needs frequent trims. Thin hair risks looking wispy with too many layers. Curls actually shrink when dry, which affects final length.
Bring reference photos showing your real hair texture and density. Your barber can’t guess what you’re working with. These photos help them choose the right layering and shaping for your specific hair type.
Face Shape Considerations
Your face shape matters just as much as your hair type when choosing a cut that will look good on you. During your barber consultation, identify whether you have an oval, square, round, heart, diamond, or rectangular face. Each shape benefits from different styles.
Oval faces work well with longer tops. Square jaws look sharp with fades on the sides. Round faces need tighter sides for proportion balance. Heart-shaped faces suit longer lengths on top.
Bring reference photos showing your face shape to your appointment. This helps your barber recommend adjustments that enhance your features. They’ll suggest a haircut that works with your natural proportions, not against them. When your barber understands your face shape, you’ll see results that match your vision.
Gather 2–3 Reference Photos Before Your Appointment

How can you make sure your barber nails your vision? Bring photos that showcase the haircut you’re after. I’d recommend collecting 2–3 images showing front, side, and back views. These reference photos become your visual language during the consultation.
Choose images matching your hair type and face shape closely. This helps your barber understand what’ll actually work for you. Highlight specific elements you love: fade levels, neckline details, how the top locks lay.
Before your appointment, adjust your photos if needed. Your head shape or hair density might differ from the models pictured. Have everything ready on your phone or printed out. During your consultation, reference these images to anchor your discussion and keep you on the same page.
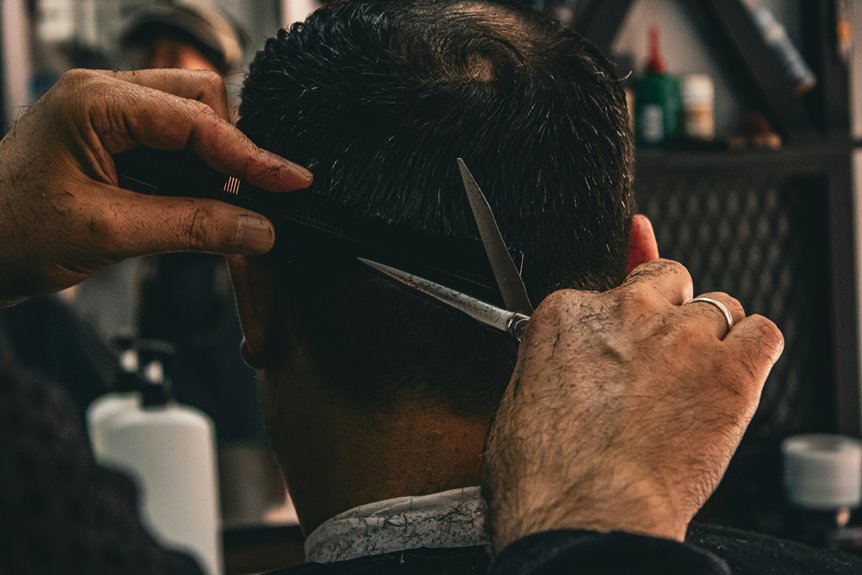
Learn Fade vs. Taper and Guard Numbers

Understanding the difference between a fade and a taper is important for communicating what you want. A fade blends hair from longer to shorter, exposing skin at the sides or neckline. A taper gradually shortens hair without showing bare skin. Knowing this distinction helps you articulate your vision to your barber.
Guard numbers represent specific hair lengths. Use them when discussing length preferences with your barber.
| Guard | Length | Best For |
|---|---|---|
| #1 | 1/8″ | Fades |
| #3 | 3/8″ | Tapers |
| #5 | 5/8″ | Top length |
| #8 | 1″ | Longer tops |
For high-contrast transitions, request a fade. For gradual blending, ask for a taper. Specify your guard numbers for top versus sides. Clear communication with your barber ensures you’ll be satisfied with your haircut.
Break Down Your Desired Look: Top, Sides, and Back

Once you’ve decided between a fade and taper and selected your guard numbers, focus on the three distinct sections of your head: top length, sides fade, and back length.
For the top, determine how long you want it and which style works best for you: swept back, textured, or sleek. When addressing the sides, specify your gradient preference. Would you prefer a sharp fade or a gradual taper? For the back, choose between squared, rounded, or tapered edges.
Bring reference photos that show exact lengths and transitions. This level of detail helps your barber execute your vision precisely. You’ll leave with confidence that you received exactly what you requested.
Specify Length Using Clipper Guard Numbers

Clipper guard numbers are your tool for translating your vision into precision. Understanding guard sizes helps you communicate clearly with your barber.
Guard #0–2: Creates short, clean looks; perfect for fades
Guard #3–5: Delivers medium lengths; ideal for textured styles
Guard #6–8: Produces longer cuts; suits fuller hairstyles
Top length measurement: Specify inches or millimeters for exact precision
Sides and back guidance: Request fade vs. taper based on your preference
When you mention specific guards, your barber understands exactly what you want. A #2 fade means consistent short sides that blend smoothly. A #4 taper offers gradual length transitions.
Bring reference photos showing guard numbers when possible. This eliminates guesswork and ensures you walk out with the cut you envisioned, confident and satisfied with the results.
Clarify Your Fade or Taper Preference

Now that you’ve nailed down your guard numbers, it’s time to address how those sides and back blend together. You’ll choose between a fade and a taper; both create gradients, but differently.
| Feature | Fade | Taper |
|---|---|---|
| Skin Exposure | Yes, visible skin | No skin shown |
| Blend Style | Smooth gradient | Subtle transition |
| Neckline | Skin fade or tapered | Longer at neck |
Tell your barber your preferred level: low, mid, or high. Specify where the transition begins on your head. Ask whether you want a clean-shaven neckline or some length remaining.
Bring visual references showing the gradient and how it meets your top length. Clarify if you prefer a smooth blend or a defined line. This conversation prevents misunderstandings and helps you leave looking exactly how you imagined.
Describe How You Want It Styled and Maintained

Once you’ve locked in your fade or taper, tell your barber exactly how you’re styling it daily. This might be a quick five-minute routine with matte paste for a natural look or a ten-minute blow-dry with pomade for something sleeker. Be specific about what products work best for your hair type and lifestyle, and ask your barber which ones they’d recommend based on your hair’s texture and thickness. Finally, confirm how often you’ll need trims to keep your cut looking fresh. Most fades and tapers need touching up every two to four weeks.
Daily Styling Routine
How you style your hair each morning shapes what your barber needs to cut. Your barber communication about daily styling routine matters because it determines the haircut’s foundation. Tell your barber exactly how much time you’ll spend styling and what products you’ll use.
Consider these styling essentials:
- Time commitment: Five minutes or thirty minutes?
- Product use: Pomade, wax, paste, or nothing?
- Tools needed: Blow dryer, brush, comb, or fingers only?
- Desired finish: Shiny, matte, or textured appearance?
- Haircut hold: Must it survive workouts and humidity?
Your maintenance frequency and product preferences directly influence what length and texture your barber cuts. If you’re applying matte paste daily, you’ll need different dimensions than someone using nothing. Honest barber communication about your routine helps your haircut work with your lifestyle, not against it.
Product and Maintenance Needs
What products you use every day should shape your haircut conversation. Tell your barber whether you’ll apply pomade, wax, cream, or gel daily. Specify if you want a matte or glossy finish. This detail matters because it determines how your barber cuts and textures your hair.
Discuss your maintenance routine honestly. How often can you return for trims; every three weeks or six weeks? Be clear about whether you want a low-maintenance cut or one requiring daily styling effort.
Ask for barber product guidance tailored to your hair type. Request specific application techniques and a simple daily routine you can actually follow. Your barber will recommend products that work with your lifestyle, not against it.
Frequency of Touch-Ups
Your haircut’s lifespan depends on how often you’re willing to visit your barber. Different styles demand different touch-up schedules based on your lifestyle and maintenance commitment.
Consider these trimming cadence options:
- Tight fades: Every 2 to 3 weeks for sharp fade maintenance
- Textured cuts: Every 3 to 4 weeks to preserve shape and texture
- Longer styles: Every 6 to 12 weeks as hair grows naturally
- Crew cuts: Every 4 to 6 weeks for consistent length
- High-maintenance looks: Weekly visits for pompadours or precision styles
Your touch-up schedule should match your haircut upkeep goals. Bring reference photos showing how you want your cut maintained between visits. This guides your barber on edge refinement and neckline expectations. Discuss whether you want the overall shape preserved while length adjusts, or precise measurements kept identical. Your lifestyle determines what’s realistic long-term.
Ask the Right Questions About Hair Type and Adjustments

Before you settle into the chair, understanding your hair’s unique characteristics helps you get a cut that works for you. Ask your barber how your specific hair type—thick, thin, straight, wavy, or curly—affects cut options and maintainability.
Understanding your hair type before the cut helps your barber recommend options that work best for you.
Discuss texture handling honestly. Tell them if your hair gets greasy, limp, or frizz-prone. These details help your barber recommend lengths that stay looking fresh longer.
Use precise language together. Request guard numbers or finger-length references instead of vague terms like “short” or “medium.” Say “#2 guard on the sides” rather than “just trim it.”
Finally, ask how your head shape influences the cut. Your barber can adjust around your jawline, cheekbones, and forehead to balance your features.
Confirm the Plan Before the Cut Starts

Before your barber picks up the shears, restate the exact plan you’ve discussed: top length, side and back lengths, and whether you want a fade or taper. Confirm your neckline shape (squared, rounded, or tapered) and clarify the fade depth or gradient transition so there’s no confusion about how the cut blends together. Finally, get explicit agreement on your styling routine and trim frequency, then you’re ready to go.
Clarify Length and Gradient
Getting specific about length and gradient separates a good haircut from a great one.
Clear communication prevents disappointment. You’ll want to nail down these details:
- Clipper guard numbers: Use #2 for 1/4 inch or reference finger-lengths for consistency
- Top versus sides: Specify exact measurements (top 4 inches, sides 2 inches)
- Taper or fade: Choose whether you want a gradient without skin exposure or one that fades to skin
- Neckline shape: Decide between squared, rounded, or tapered back edges
- Confirmation step: Ask your barber to repeat the plan and show reference photos
This conversation keeps you both aligned before the clippers start. Your barber appreciates clarity too. It sets you up for success and a haircut you’ll actually wear out with confidence.
Review Neckline and Styling
Now that you’ve locked in your length and fade specifics, it’s time to finalize how your neckline looks and feels. Your neckline shaping matters because it frames your whole look.
| Neckline Style | Best For |
|---|---|
| Squared | Sharp, defined edges |
| Tapered | Smooth, gradual blend |
| Rounded | Soft, natural appearance |
| Blocked | Clean, precise lines |
Tell your barber exactly how high your fade should reach at the neck and sides. Discuss whether you want a clean block line or a softer transition blending into your back finish. Ask about leaving length at the nape for natural texture or shortening for sharper definition.
Finally, explain your styling plan. What products will you use? How will you brush or comb your neckline daily? These details help your barber understand the complete vision you’re after.
Confirm Adjustment Openness
Have you and your barber actually locked in the same game plan? Before those shears touch your head, pause for real communication. Ask your barber directly: are they comfortable tweaking details if needed? This openness to adjustments keeps you both aligned.
Here’s what to confirm together:
- Fade vs. taper preference and guard numbers for each section
- Neckline shape: squared, tapered, or natural taper
- Top length in inches or specific guard sizes
- Professional recommendations for what’ll actually work with your hair texture
- Maintenance feasibility based on your weekly styling time
Lock in these specifics now. Ask, “What adjustments are you open to during the cut?” This conversation validates your plan’s practicality. You’re not just hoping for results; you’re building trust through clarity and genuine collaboration.
Discuss Back Shape and Neckline Finish

What happens at the back of your head matters just as much as the front and sides. You’ll want to specify your preferred back shape (block, rounded, or tapered) to match your overall style. Consider how your neckline finish should look. Do you prefer a clean squared edge or a softer tapered finish?
Bring reference photos showing exactly what you want. This clarity prevents misunderstandings. Tell your barber whether you’d like the back longer for contrast or kept evenly short for uniformity. Discuss your fade or taper level to achieve seamless blending into the sides.
Finally, mention your hair’s natural growth pattern. Your barber can then adjust the cut accordingly, so your back shape works with how your hair grows.
Return Regularly and Refine Over Time

Once you’ve nailed down the back shape and neckline finish with your barber, the real work begins: keeping that cut looking sharp. Regular visits every four to six weeks maintain your haircut’s integrity as it grows. You’re not just getting trimmed; you’re building a communication pattern with your barber that creates haircut evolution.
Key habits for maintaining your look:
- Schedule appointments consistently to prevent overgrowth
- Bring reference photos showing your current style preferences
- Track how your sides and top lengthen at different rates
- Request specific refinements like smoother necklines or lighter weight
- Reassess whether the cut still suits your face and lifestyle
Each visit lets you make small adjustments progressively. This approach keeps your style refined without drastic changes, allowing you to maintain a polished appearance consistently.