I’ve mastered curling medium hair by starting with completely dry, detangled strands and applying heat protectant spray throughout. I section hair from bottom to top, then use a 1.25-inch clamp iron to roll each section midway down, holding for three to five seconds. I let curls cool completely before gently separating them with my fingers. Finishing with texture spray keeps everything bouncy and defined through day two. The techniques behind perfect waves reveal themselves when you understand the specific choices that matter most.
Prepare Medium Hair for Curling Success

How do you get curls that actually last? The answer starts before you even pick up your curling iron. First, make sure your hair is completely dry and detangled. This prevents breakage and creates a smooth canvas.
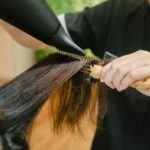
Next, apply a heat protectant spray throughout your strands. This essential step shields your hair from damage while you work. Then comes sectioning, which you should do from bottom to top. Keep your bottom layer separate first, then work upward for even coverage.
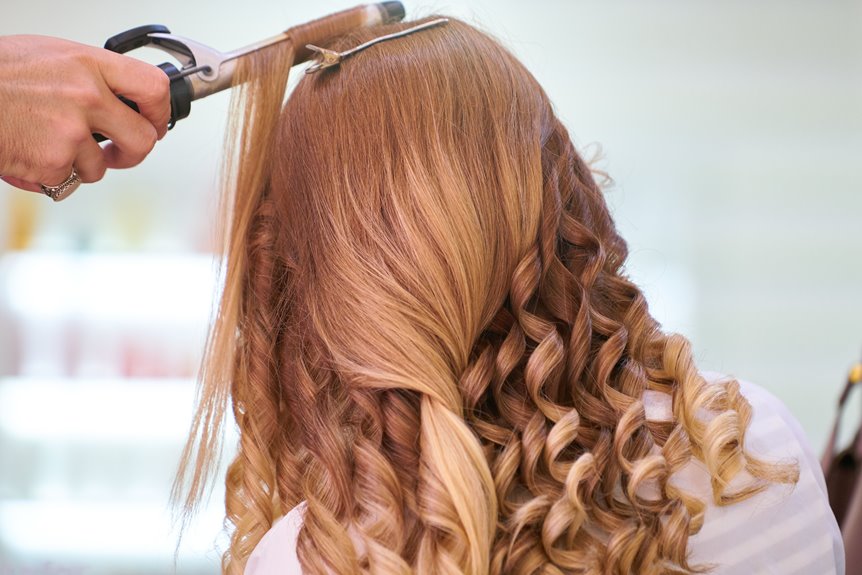
Use a clamp-based barrel curling iron (1″ or 1.25″) because it gives you better control than a wand. The clamp holds sections securely, ensuring consistent results. Finally, let each curl cool completely before touching it. This cooling set makes your curls last longer and hold their shape beautifully.
Clamp Iron vs. Wand: Which Tool Works Best for Medium Hair?

When you’re choosing a curling tool, you’ve got two main contenders: a clamp iron or a wand.
A clamp iron gives you precision and control. The clamp holds your medium hair securely while you wrap strands, preventing slipping. This means tighter, more defined curls. A 1-inch barrel creates tight curls, while a 1.25-inch produces looser waves. You can pick based on your goals.
A curling wand offers beachier waves with flatter ends. You’ll get that softer, more natural look without the structured hold.
Consider heat settings too. Some tools like ghd offer single settings, while T3 irons provide multiple heat settings for different curl sizes. Match your tool choice to your desired outcome and preferred styling method.
Choose Your Barrel Size: How Curl Tightness Affects Results

Your barrel size is everything when you’re curling medium hair. Understanding how it affects your curl tightness and overall results will help you achieve your desired look.
| Barrel Size | Curl Type | Best For |
|---|---|---|
| 1-inch | Tight, defined curls | Shorter, shoulder-length hair |
| 1.25-inch | Loose waves | Medium-length versatility |
| 1.5-inch | Beachy, soft texture | Longer, fuller looks |
With a curling iron, smaller barrels require more sectioning passes but deliver impressive definition. Larger barrels work faster and create relaxed waves. Your heat settings matter too; consistency helps your sectioning hold throughout the day.
Choose based on your desired outcome. Tight curls need smaller barrels, while looser waves benefit from larger ones. Match your barrel size to your hair length and texture goals for the best results.
Section Your Hair for Even, Professional-Looking Curls

Now that you’ve picked the right barrel size, it’s time to prepare your hair for curling. Sectioning is a key technique for achieving professional-looking results.
I divide my hair into bottom and top layers, starting from the lower sections and working upward. This approach distributes the curls evenly throughout. Using a fine-tooth comb and clips, I create precise sections that keep hair taut while I work.
For dimension, I curl some front sections away from my face and others toward it. This variation prevents a uniform appearance and creates natural movement.
When finishing curls, I clamp the curling iron midway down each strand, roll toward my scalp, then slide the ends out without fully releasing. This technique maintains the perfect bend I’m looking for.
The Clamp-and-Roll Method: Step-by-Step Technique

How do you transform a flat section of hair into a bouncy, controlled curl? The clamp-and-roll technique delivers professional results.
Start by positioning your curling iron at 90 degrees from your scalp. Twist your 1-inch section away from your face to create tension, then wrap it around the barrel. Here’s what makes this method work:
Position your curling iron at 90 degrees from your scalp, twist away from your face, and wrap around the barrel for tension.
- Hold the wrapped section for a few seconds while heat sets the curl
- Gently loosen the clamp and slide hair down, leaving ends straight
- Alternate curling directions around your head for natural dimension
This approach works beautifully on medium hair. Ringlets won’t look uniform or stiff. Once curls cool completely, brush gently and apply texturizing product for lasting hold.
Curl Away From Your Face for a Flattering Frame

When you’re curling your front sections, think strategically about direction. Alternating which way you curl creates dimension rather than a flat, uniform look. You’ll curl some pieces away from your face and others toward it, which frames your facial features naturally and keeps the style from feeling too polished or one-dimensional. As you finish each curl by pulling the iron straight down, you’re setting those front pieces to sit exactly where they should, giving you control over how they sculpt around your face.
Front-Face Curl Direction
The direction you curl your front-face sections affects how flattering your style looks. Varying your curl direction creates that natural movement most people want.
Here’s what works:
- Curl some sections away from your face to open up your features and create width
- Curl other sections toward your face on alternating pieces for dimension and contrast
- Pull the iron down at the ends to keep front pieces straight and prevent that inward curl
This mixed approach gives you face-framing that feels intentional yet relaxed. The key is avoiding uniform ringlets, which can make curls look dated. After curling, lightly finger-comb your front sections to blend everything together seamlessly. This technique keeps your style looking polished and professional.
Achieving Lived-In Style
Now that you’ve got the mixed curl directions down, it’s time to refine your technique for that polished, natural-looking style. The foundation? Patience and the right products.
After you’ve finished curling with your curling wand, allow curls to cool completely. This cooling period sets the shape and helps your waves last longer throughout the day. Once they’re cool, apply a flexible hold hairspray, not heavy-duty. You want movement, not rigidity.
Here’s the key step: use texture spray at your roots. This adds separation and prevents that overly polished appearance. Spray lightly, focusing on areas away from your face where you want extra dimension.
Your loose waves should feel touchable and natural. This balanced approach gives you that relaxed, understated vibe while maintaining structure and longevity.
Framing Facial Features
How you style your front sections significantly impacts your overall look. I curl my framing hair away from the face to emphasize my features in an organic way. This technique directs attention upward and creates dimension.
Here’s my approach:
- Begin with bottom layers, curling each front section away from the face consistently
- End each curl by pulling the iron down so pieces sit in an organic outward position
- Alternate curling directions on some front pieces for added visual interest
After I finish curling, I let everything hold and cool completely before touching anything. Once cooled, I apply finishing products to maintain that outward curl without flattening it. This keeps my framing pieces exactly where I want them throughout the day.
Alternate Directions to Avoid One-Dimensional Ringlets

As a result of mastering basic curling technique, it’s time to think strategically about direction. Alternating your curling directions is essential for creating dimension rather than uniform ringlets.
Here’s what works: curl some sections away from your face and others toward it. This approach adds natural movement and breaks up curls effectively. For your front-face pieces, vary the direction on each section. You’re creating contrast that prevents that stiff, overdone appearance.
Don’t curl everything the same way. Instead, think of your head in zones: top, sides, and back. Rotate your directions throughout these areas for balanced texture.
After curling, gently finger-comb to break up any remaining uniformity. This final step creates individual ringlets that work together into a cohesive, natural finish that feels authentically yours.
Keep Ends Soft While Rolling and Unrolling

Have you noticed how curled ends can look crispy or overdone? Keeping ends soft requires intentional technique during rolling and unrolling.
Here’s what works:
- Wrap loosely: Wrap each section around the curling iron, leaving the last 2 inches unwrapped so ends stay naturally soft and undone.
- Hold strategically: Hold the curl for 3 to 5 seconds, then slowly untwist without clamping the ends tightly against the barrel.
- Unroll gradually: Unclasp slowly and let the strand fall freely, preventing the ends from getting crimped or overworked.
This approach keeps your ends looking intentional rather than harsh. The key is respecting those final inches; they deserve gentler treatment than the rest of your section.
Cool Your Curls Completely Before You Touch Them

Why do some curls fall flat within an hour while others last all day? The answer lies in patience. Allowing curls to cool completely sets their shape and maximizes longevity. When I skip this step, my curls collapse almost immediately.
Here’s why cooling matters: warmer curls are fragile. They need time to lock into their formed pattern. I give my curls several minutes to cool fully before doing anything.
Once they’re cool, I use my fingers or a wide-tooth comb for gentle separation. This prevents frizz while maintaining definition. Rushing this process ruins everything I’ve worked toward. That dedicated cooling period helps my curls last longer, turning temporary waves into lasting texture that belongs in my styling routine.
Brush Out Curls for Separation and Natural Movement

Once your curls have cooled completely, grab a Cricket Comb to brush through them with precision. Separating each curl creates natural wave definition and prevents them from clumping together. This step takes tight ringlets into a more relaxed, textured look that frames your face well.
Separating Curls With Precision
After your curls have set, separation is where the work pays off. Letting cooling curls fully cool before touching them preserves what your curling iron has done. Once they’re completely set, use a wide-tooth comb or your fingers to gently separate sections. This technique creates definition while maintaining that relaxed, textured look you’re after.
Here’s my approach:
- Section strategically – Work with smaller, controlled portions to maintain curl definition
- Separate gently – Use finger separation or a wide-tooth comb for soft, natural results
- Add texture spray – Apply texture spray at the roots for pieciness and movement
The separation phase turns tight curls into relaxed waves. Focus on the top and front sections where texture matters most. This step shifts your entire look.
Enhancing Natural Wave Definition
To transform tight curls into soft, piece-y waves, I brush them out once they’ve cooled completely. This step creates the beachy waves look we’re after by separating each curl while maintaining overall shape.
I grab my Cricket Comb and gently work through the curls with deliberate strokes. The brushing action breaks up tightness without destroying the curl structure.
Next, I apply Oribe Dry Texturizing Spray directly at the roots. This product adds texture and pieciness between separated curls, enhancing natural movement.
Finally, I finish with a light wax stick on the ends. This shapes individual pieces while preserving that soft, intentional wave we created with our curling wand.
The result is waves with defined separation and dimension that look intentional rather than overdone.
Add Texture Spray for Hold Without Crunchiness

Texture spray is your undercover tool for keeping curls separated and voluminous without that stiff, crunchy feel. The right spray enhances your curl definition while maintaining movement and natural-looking texture.
Texture spray is your undercover tool for keeping curls separated and voluminous without that stiff, crunchy feel.
How to apply texture spray effectively:
- Spray after curls cool completely to set the shape without flattening volume
- Focus on the crown and ends to maximize root volume and a lived-in appearance
- Use light, even mists rather than heavy application to avoid weighing down your waves
Choose a light to medium hold formula that won’t create buildup. Apply texture spray to dry hair after curling or between wash days as a refresher. This method gives you separation and definition while keeping your curls looking effortlessly beautiful and touchable.
Extend Your Curls Into Day Two and Beyond

Your curls don’t have to disappear after day one. You can refresh them overnight using dry shampoo and texturizing spray to bring back hold and texture without re-curling everything from scratch. On day two and beyond, focus on refreshing just the fallen pieces by pinching them back into shape with styling products. This keeps your curls looking intentional and fresh throughout the week.
Refresh Curls Overnight
When your curls lose their grip and separation by day two, you don’t need to start from scratch. A quick refresh technique saves time and keeps your curls looking fresh without daily heat damage.
Here’s what to do to revive your curls:
- Apply dry shampoo at the scalp and crown areas with light spraying
- Use texture spray on fallen pieces to restore separation and grip
- Reshape gently while curls cool completely before touching them again
Focus on problem areas rather than re-curling everything. Target the scalp-adjacent sections where curls naturally fall first. A minimal amount of product maintains that natural look most people prefer. This curl technique extends your style into day three while protecting your hair from excessive heat.
Extend Hold With Products
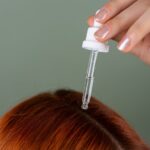
The right products help keep your curls intact past day one. On day two or three, I reach for dry shampoo at my roots first. This absorbs oil and adds grip where my curls need it most. Next, I apply a light texturizing spray to refresh the texture throughout. These two products work together to reactivate my curls without heat damage.
When refreshing, I focus on scalp-adjacent areas only. I re-wet just near the roots, then spritz texturizing spray on the lengths. This targeted approach maintains volume and helps my curls hold their shape longer.
If some pieces have straightened, I re-curl only those sections instead of my entire head. This strategy extends my curl longevity while saving time and protecting my hair from excessive heat.
Refresh Second-Day Curls With Dry Shampoo and Moisture

How can you extend your curl style without rewashing your entire head? Dry shampoo is an effective tool for second-day refresh. It absorbs oil, boosts grip, and adds texture to your mid-length hair without requiring a full wash.
Here’s my approach:
- Apply dry shampoo at roots and mid-lengths, then lightly tousle to reactivate volume
- Use a texture spray afterward for smoother restyling and enhanced curl pattern
- Re-curl only loose sections selectively to preserve that natural appearance
After applying these products, I let my curls settle for a few minutes before touching them. Then I finish with a light hairspray mist to set everything in place. This routine keeps my second-day curls looking fresh and intentional.
Fix Flat or Falling Curls: Quick Diagnosis and Solutions

I’m going to help you spot why your curls aren’t holding and show you exactly how to fix them. Whether your waves are falling within hours or looking limp by day two, we’ll identify what’s going wrong and get your curls back on track. Let’s work through the common problems, learn quick refresh techniques, and set you up with strategies that’ll keep your curls looking fresh longer.
Identifying Common Curl Problems
Flat or drooping curls don’t mean you’ve failed. They’re a signal that something in your process needs adjustment. Pinpointing the exact culprit makes fixing them straightforward.
Common curl problems I see:
- Damp hair during curling. Moisture prevents curls from setting properly, causing them to fall within hours.
- Excessive tension or twisting. Wrapping too tightly around your curling iron crushes the curl shape and creates uneven results.
- Skipping cool-down time. Touching curls before they fully cool disrupts the set and invites frizz.
Start by checking if your dry hair is truly ready. Use a heat protectant before touching your curling iron. Apply even tension without twisting the entire strand. After curling, let everything cool completely. On days two and three, try refreshing with texture spray instead of restyling everything.
Refreshing Limp Or Dropped Waves
When your curls lose their bounce by day two or three, you don’t need to start from scratch. Selective re-curling works well for reviving your beach waves without redoing everything.
Start by lightly re-wetting the sections near your scalp and the face-framing pieces. These areas tend to flatten first. Apply a lightweight texture spray at the roots to revive volume, then re-curl only those specific sections with a 1-inch barrel, curling away from your face.
On day two or three, use dry shampoo to absorb oils and help grip your roots better. Finish with a flexible-hold spray and a light shine serum to re-define texture without weighing down your waves. Your curls are ready to go.
Preventing Future Curl Collapse
Preventing Future Curl Collapse
Understanding why curls fall flat is just as important as the styling technique itself.
Preventing curl collapse starts before you even pick up your curling iron. Here’s what actually works:
- Always use a heat protectant and keep your hair fully dry before styling, since damp strands can’t hold definition
- Let sections cool completely after curling. This sets the shape permanently, so don’t touch warm hair
- Finish with flexible-hold hairspray or texture spray at roots and mid-lengths for lasting support without stiffness
On days two and three, refresh your curls with dry shampoo instead of re-curling everything. This approach keeps your waves bouncy and prevents the frustrating collapse that happens when you restyle repeatedly.
Practice Until Curling Becomes Your Go-To Styling Move

How many times do you need to curl your hair before it feels natural? I’d say about ten to fifteen tries. After that, your hands start remembering the motions automatically.
When you practice regularly, you’ll develop muscle memory for your preferred curling method. Start with dry hair and a heat-protectant spray each time. Section your hair consistently; thinner sections create tighter curls, while thicker ones give looser waves. Use your curling iron with steady wrap-and-hold timing, typically three to ten seconds per section.
The key is repetition. Soon you’ll curl without thinking about barrel placement or hand positioning. Your body learns the rhythm. You’ll also notice which techniques work best for your hair type, making styling faster and more reliable.