The Bradley Cooper Hangover cut features textured layers and an inverted top that sweeps across your face. You’ll need wavy to straight hair and should grow your top to 4-5 inches while keeping sides tapered short. Use point-cut layering, not blunt cuts, for that textured finish.
Style with pomade or texturizing spray by blow-drying backward toward your crown. Regular barber visits every 2-6 weeks maintain the shape. This cut works casual or dressed-up depending on your product choice and styling approach.
Getting this look requires specific technique. Your barber should use point-cutting methods to create movement and separation in the layers rather than creating heavy, blunt lines. The goal is a piece-y appearance that looks intentional without appearing overly groomed.
For styling, apply product to damp hair and direct it backward and upward. The texture spray works well for a more relaxed daytime version, while pomade gives you a polished evening look. Blow-dry with movement to activate the layers and create dimension.
Maintenance matters with this style. Schedule appointments every 2-6 weeks to keep the layers defined and the sides properly tapered. Between cuts, a quality texturizing spray refreshes the look and adds hold without weighing down your hair.
Is Your Hair Type Right for This Cut?
Before you book that appointment, let’s figure out if your hair is actually suited for the Bradley Cooper Hangover cut.
Your hair type matters here. This cut works best on very wavy to straight hair; think texture with natural movement. If you have curly or tightly coiled hair, you’ll struggle to achieve that look.
Very fine hair poses challenges too. You’ll need decent volume to pull off the style without it falling flat. Similarly, frizz-prone hair requires extra maintenance that might frustrate you.
Here’s the good news: straighter hair can work, but expect styling commitment. You’ll need to add texture and movement yourself.
The key is starting with adequate length on top. That foundation lets you create the signature dimension this cut demands.
What Makes the Hangover Cut Distinctive: Length, Layers, and Texture

I’ll show you what separates this cut from others: it’s all about how you grow and layer your hair strategically. You’ll need to maintain longer length on top, noticeably longer than your back and sides, while using point-cut layering techniques that create soft, random pieces instead of blunt, heavy lines. This combination of extended growth and textured layering produces that relaxed yet deliberate appearance that works whether you’re dressing up or keeping things casual.
Length Requirements And Growth
Getting the Hangover cut right starts with understanding how much hair you’ll actually need. You can’t achieve this style without adequate length on top; think several inches longer than your sides and back.
Here’s the reality: hair grows roughly half an inch monthly. Plan ahead by starting to grow out your hair before your appointment to reach that sweet spot where your stylist can work with proper proportions.
The fringe should land just above your eyebrows when wet. Your top needs enough length to sweep loosely across your face without sitting flat. Shorter sides paired with insufficient top length creates imbalance and an unruly appearance instead of the textured, soft look you’re after.
Start your growth phase now.
Layering Techniques For Texture
What separates the Hangover cut from basic shorter hairstyles? Strategic layering. I’m talking about using point-cut techniques that create soft, random pieces rather than blunt, heavy layers.
Here’s what makes it work: I over-direct hair toward your middle profile to build an inversion on top. This softens the layering and gives you that rounded, all-around feel you’re after. The sides and back gradually taper shorter, which maintains a loose, textured silhouette that actually moves.
The key is avoiding uniform layers. Instead, I’m creating dimension through strategic placement. Your bangs hit just above the eyebrow when wet. These techniques work together, giving you texture that supports swept-back or middle-parting styles. You’ll get that naturally textured look that defines the Hangover cut.
How Long Should You Grow Your Hair First?

How Long Should You Grow Your Hair First?
Before you book that first appointment, you’ll need to give your hair time to grow. The Bradley Cooper look requires serious length on top, and hair growth happens gradually; about half an inch monthly. You’ll want to start with longer hair than you think necessary.
| Timeline | Top Length | Sides Length |
|---|---|---|
| Month 1 | 2-3 inches | ½ inch |
| Month 3 | 4-5 inches | 1 inch |
| Month 6 | 6+ inches | 2 inches |
During this pre-cut grow-out period, schedule trims every few weeks to months. This keeps your shape manageable while you’re building length. Starting with longer fringe and top gives your barber room to layer and create texture as your hair grows. You’re investing in the foundation for that signature tousled style.
The Barber Conversation: What to Say and Show

How you communicate with your barber shapes the outcome when requesting the Bradley Cooper Hangover haircut. Bring a clear photo if you have one; it eliminates guesswork. If not, describe your hair vision precisely: ask for a mid-length, layered cut with longer fringe that sweeps off your face.
Explain that you want texture maintained throughout. Request point-cut techniques rather than heavy layering patterns, especially if your hair is thick. Emphasize scissor work over clippers for essential sections.
Tell your barber you’re committed to regular maintenance visits. This cut requires upkeep to stay sharp. A collaborative conversation ensures you’ll walk out with the exact style you’re after, ready to shift between swept-back and side-parted looks with ease.
Blow-Dry the Bradley Cooper Look: Technique and Tools

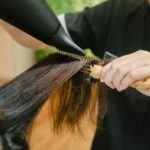
Once you’ve settled on your cut with your barber, nailing the blow-dry technique matters significantly in achieving that signature Bradley Cooper sweep. I’ll walk you through the specific methods: choosing the right brush, directing your airflow, and applying products strategically. You’ll learn how vent brush application, drying direction, and pomade placement work together to turn damp hair into that polished, refined look.
Vent Brush Application Method
The vent brush works effectively for achieving the Bradley Cooper swept-back style. Position it at your back hair, directing airflow toward your crown. This technique builds the signature lifted foundation you need.
Start positioning. Place the vent brush underneath your back hair sections, angling upward. The open design allows air to circulate freely, building volume naturally.
Direct the flow. Move the brush backward and upward simultaneously. This channels hot air exactly where you need it, lifting strands away from your scalp.
Control intensity. Adjust your dryer’s speed based on your desired results. Higher heat creates sleeker finishes; medium settings preserve texture and movement.
The vent brush method gives you precision without the heaviness traditional brushes create. You’ll develop the intentional, well-groomed appearance that comes from understanding your tools and applying them properly.
Drying Direction And Volume
While the vent brush builds your foundation, hand-lifting takes over as your primary styling tool. I’m guiding damp hair toward your crown with a hairdryer, creating that signature swept-back volume you’re after.
Here’s your three-step drying direction:
- Lift and direct – Hold your hairdryer in one hand while lifting strands upward with your fingers, directing airflow toward the crown
- Over-direct slightly – Push hair back more than your final style requires; it’ll settle naturally as it cools
- Finish strategically – Work the sides last, keeping them smooth while maintaining top volume
This technique takes roughly five extra minutes. You’re building texture, not stiffness. The result is waves that look naturally tousled, as if you belong in this look.
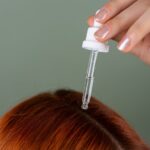
Pomade Integration After Drying
Your hair’s still slightly damp; that’s perfect timing for pomade application. This is when you’ll slick back your strands for that signature Bradley Cooper polish.
Take a small amount of pomade and work it through your roots to mid-lengths using your fingers. This prevents your scalp from feeling heavy while keeping everything controlled.
Choose your pomade based on your vibe. Want that red-carpet shine? Go medium to high-finish. Prefer something more relaxed? A lighter styling cream works better.
Work the product through with your hands, reshaping as you go. Keep your top layered and textured; avoid making it flat or overly slicked.
Your fringe should sweep away from your face naturally, never clumping together. You’re aiming for polished yet relaxed.
Apply Pomade for a Polished, Swept-Back Finish

Apply Pomade for a Polished, Swept-Back Finish
Once you’ve washed and towel-dried your hair, it’s time to introduce pomade for that signature polished look. This step refines your cut into the style you’re after.
Pomade transforms your cut into a polished, refined style once hair is washed and towel-dried.
- Warm the pomade between your palms until it’s soft and workable
- Distribute evenly from roots to ends for consistent texture and shine
- Avoid overloading at the roots to prevent weighing your hair down
Apply sparingly at first; you can always add more. Run your pomade-coated fingers through your hair, guiding everything backward toward your crown. This builds volume while maintaining control.
Your choice here matters. Want that slicked-back formal vibe? Keep it tight. Prefer relaxed and natural? Sweep it loosely away from your face. Either way, you’re achieving the Bradley Cooper aesthetic we’re building together.
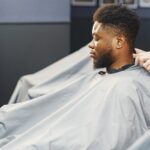
Go Slicked-Back or Loosely Swept: Which Works for You?

Go Slicked-Back or Loosely Swept: Which Works for You?
How you finish your Bradley Cooper haircut depends entirely on the vibe you’re going for.
The Slicked-Back Option
Want a polished, sophisticated look? Go slicked-back. This haircut style demands high-shine pomade that keeps everything sleek and controlled. You’ll look sharp for formal events or professional settings. The commitment involves regular touch-ups to maintain that refined appearance.
The Loosely Swept Version
Prefer something more relaxed? Choose loosely swept instead. This approach uses lighter texture cream for an effortless, undone aesthetic. You get that intentional messiness without appearing unkempt. It’s perfect for casual outings and everyday wear.
Finding Your Fit
Both variations work with the same foundational cut. Your choice simply comes down to lifestyle and personal preference. Experiment with each style; you might discover you love switching between them depending on your plans.
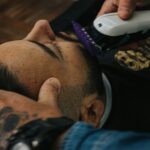
Solve Hangover Haircut Styling Problems: Flat Crown, Frizz, Uneven Waves

Whether you’ve chosen the slicked-back polish or the loosely swept ease, the Bradley Cooper haircut can throw you some curveballs.
Different hair types need different solutions. Here’s what works:
- Flat crown? Over-direct the top toward your middle profile to create inversion and lift. Layering softens the look naturally.
- Frizz frustrating you? Use point-cut technique on heavy hair to maintain random pieces. This prevents that uniform, weighty silhouette that amplifies frizz.
- Uneven waves? Apply texturizing spray to damp hair, then blow-dry with fingers rather than a brush. This encourages natural waves without flattening your crown.
Finish with lightweight pomade or styling cream applied sparingly from roots to ends. Grow your top four to five inches for visual lift.
Must-Have Products: Pomade, Texturising Spray, and Vent Brush

To nail the Bradley Cooper Hangover haircut, you’ll need three key products working together.
Pomade creates that signature slightly wet, high-sheen finish you’re after. Rub it between your palms until it softens, then distribute it from roots to ends on damp hair. This keeps your longer front pieces in place without excessive buildup.
Texturising spray maintains the messy, separated texture throughout your day. It adds natural movement and prevents your style from looking too polished or stiff.
A vent brush directs your hair back toward the crown during blow-drying. This tool prevents heaviness and supports that swept-back aesthetic.
Together, these three essentials give you flexibility. Use more product for a slicked-back formal look, or less for an undone, casual finish. You’re controlling your style now.
Keep It Fresh: Barber Visits and At-Home Maintenance

Keep It Fresh: Barber Visits and At-Home Maintenance
Maintaining the Bradley Cooper Hangover cut requires commitment on two fronts: professional trims and daily styling. You’ll want to schedule regular barber visits every 2-6 weeks, depending on your hair growth rate and preferred length. This keeps your cut looking sharp and intentional.
Here’s what you need to focus on:
- Schedule consistent barber visits to maintain the layered, swept-back shape
- Implement a grow-out phase so your top stays longer while sides remain neat
- Practice daily at-home styling with texturising spray and your vent brush
Between appointments, blow-dry your damp hair back toward the crown for volume. Apply light to medium pomade from roots to ends, avoiding excess product at the roots. This routine keeps you looking polished and part of the style-conscious community.
Adapt Your Styling: Casual vs. Formal Finishes

The Hangover cut offers notable styling versatility. You can shift the look from laid-back to polished based on your occasion. This section covers how to achieve both the casual swept-back finish and the formal slicked-down appearance using the same haircut. Texture enhancers and pomade serve as your primary tools for moving between these two distinct styles.
Casual Swept-Back Finish
Want that effortless, just-rolled-out-of-bed vibe? The casual swept-back finish delivers it. Here’s how to nail it:
- Apply texture enhancer to damp hair for lift and a slightly wet sheen
- Use your hands and dryer to push strands toward the crown. Skip the brush entirely.
- Let pieces fall naturally around your ears for that relaxed, breathable texture.
Style with minimal product and air-dry whenever possible. This approach creates loose, natural bounce instead of rigid slickness. A few softer pieces around your perimeter preserve the hangover vibe while keeping things effortless.
You’re aiming for undone polish here. The swept-back look works because it feels casual, not overdone. This finish lets you join the crew rocking that lived-in aesthetic everyone’s after.
Formal Slicked-Down Look
Ready to elevate your Bradley Cooper hangover cut for black-tie events? Transform your casual style into polished sophistication. Slick your hair straight back for a sleek, refined finish that commands attention.
| Step | Product | Technique | Result |
|---|---|---|---|
| Prep | Texturising spray | Dampen hair evenly | Enhanced grip |
| Dry | Blow dryer | Back toward crown | Volume control |
| Style | Pomade | Root to ends | Glossy finish |
| Set | Optional hairspray | Light mist | Longevity |
Apply pomade generously to create that high-sheen effect. Work it through your damp hair, starting at the roots and combing everything backward. Avoid overdoing product at the roots. This keeps your haircut’s texture intact while achieving that polished look. A formal approach maintains your style with a sharp, professional appearance ready for any occasion.
The Bradley Cooper Haircut: Quick Reference Checklist

How do you nail this iconic messy-textured look? Review what you need to know before heading to your barber.
- Length matters: Grow your top to four or five inches with layered, textured sections for that signature style.
- Technique is key: Ask your barber for point-cutting on heavy hair to create random pieces and soft texture throughout.
- Styling flexibility: Use pomade or texture enhancer to switch between a slicked-back formal vibe and loose, textured wear.
When you visit your barber, bring a photo of the Bradley Cooper Hangover haircut. Describe exactly what you’re after: the longer sides, inverted top, and that deliberately undone feel. This checklist prepares you to communicate clearly with your barber.