To style hair with pomade like a pro, follow these five steps.
First, start with clean, slightly damp hair and select pomade that matches your desired finish, whether matte or high-shine. Next, warm a pea-sized amount between your fingertips until it becomes workable. Then apply it at your roots using a 360-degree method, working through the hair evenly. After that, comb or finger your style into place depending on the look you’re creating. Finally, air-dry for texture or blow-dry for a polished appearance. Each step builds on the previous one, creating results that last throughout the day.
Prep Your Hair and Pick the Right Pomade for Your Style

Why does your pomade work better on some days than others? The answer lies in preparation. I start with clean hair that’s towel-dried to remain slightly damp. This activates your pomade and allows for even distribution from roots to ends.
Next, I select my pomade based on the finish and hold I want. Matte pomades give natural texture, while high-shine options create slick looks. Light hold works for fine hair; high hold suits thicker strands.
Water-based pomades wash out easily with minimal buildup. Oil-based pomades deliver stronger hold and shinier finishes. Before applying, I emulsify the product between my fingertips. For short hair, I use a pea-sized amount. This preparation work improves your entire styling experience.
Warm a Pea-Sized Amount Between Your Fingers

Warm a pea-sized pomade amount between your fingertips using counter-circular motions to activate its properties.
The foundation of great pomade application starts small. You’ll want to grab just a pea-sized amount. This prevents that heavy, weighed-down look you’re trying to avoid. Here’s your styling technique:
- Place the pomade between your fingertips, not your palms
- Rub in counter-circular motions to warm and emulsify the product
- Continue until it transforms into a smooth, workable consistency
- Feel the warmth activate the pomade’s properties
This emulsification process matters because it helps you distribute the product evenly throughout your hair roots. When you warm the pomade this way, you’re preparing it to coat each strand without clumping. If you need more coverage, simply repeat the process. This approach provides even coverage and gives you total control over your final style.
Apply Pomade to Your Roots and Work It Through Evenly

Now that you’ve warmed your pomade, it’s time to apply it where it matters most: at your roots. Start by working the pea-sized amount directly into your hair’s base, focusing on roots first. This approach lets you control hair direction from the foundation upward. Use a 360-degree method; cover your front, back, and sides thoroughly. Don’t skip those hard-to-reach areas.
Once you’ve distributed product at the roots, work through the lengths with your palms. Run them downward to merge everything evenly. This prevents patchiness and ensures consistent coverage for short hair and longer styles alike. If you need more pomade, add gradually. You’re aiming for even distribution without weighing down your roots. The key is patience and precision during this step.
Comb or Finger Your Style Into Place

Comb or Finger Your Style Into Place
Once your pomade’s distributed evenly through your roots and lengths, it’s time to shape your style. Now comes the fun part: deciding whether you’ll use a comb or your fingers to finish.
Here’s how to nail that final shape:
- Use a comb for sleek precision. Run it through to create sharp lines and distribute product uniformly for maximum shine.
- Choose fingers for texture and volume. They break apart pomade naturally, giving you that piecey, relaxed look you’re after.
- Combine both tools strategically. Run your palms through first for 360 coverage, then let the comb guide everything into place.
- Adjust as needed. Use fingertips to refine texture and the comb to set final lines and enhance shine.
The key is matching your tool to your desired finish.
Air-Dry or Blow-Dry to Lock in Your Look

Air-Dry or Blow-Dry to Lock in Your Look
After you’ve combed or fingered your pomade into place, the drying method you choose will affect how your style looks and lasts.
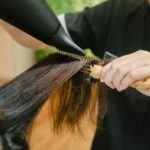
Air-drying preserves your hair’s natural texture and delivers a softer, matte finish. This approach works well when you’re going for a relaxed vibe. Blow-drying with cold settings, however, gives you more control. You’ll add volume at the roots and create that polished, high-shine look many prefer.
Here’s what works: use your comb while blow-drying to lift roots and set your pomade’s direction. This technique sets your styling immediately. Once you’ve dried completely, finish with light hairspray. This final touch secures everything without weighing down your hold. Your style will stay sharp all day.